Table of Contents
- What's the Deal with Climate-Controlled Storage?
- Step 1: Clean Everything Like You’re Lending It to a Neat Freak
- Step 2: Take Stuff Apart (You’ll Thank Yourself Later)
- Step 3: Keep an Inventory (Doesn’t Have to Be Fancy)
- Step 4: Use Real Packing Materials, Not Trash Bags
- Step 5: Wrap According to What It’s Made Of
- Step 6: Pack the Unit Like You’re Tetris Champion
- Step 7: Check In Every Few Months
- Common Mistakes I’ve Made (and Seen Friends Make, Too)
- Final Thought
Let’s be real: most of us don’t think about “how to store furniture properly” until we’re already in the middle of it. You’re standing there, sweating in a storage unit, your couch won’t fit, the legs are poking out of the blanket you wrapped it in, and suddenly you realize—this isn’t just about shoving stuff into a box and locking the door.
I’ve been through it. I’ve stored furniture during a move, during a remodel, and once just because I got tired of looking at it. And after a few mistakes (some costly, others just annoying), I finally figured out a method that works—especially when you’re using a climate-controlled storage unit.
If you’re about to do the same, here’s everything I wish I’d known ahead of time.
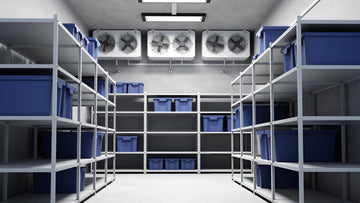
What's the Deal with Climate-Controlled Storage?
At first, I thought this was a marketing gimmick. I mean, how much damage can a little heat or cold actually do to a table or a chair?
Turns out… a lot.
Climate-controlled storage means the place maintains a pretty steady temperature—usually between 55°F and 85°F—and controls humidity, too. That second part is crucial. Moisture is the real enemy here, especially for wood, leather, fabric, and metal. Basically, if it’s not made of concrete, it probably hates humidity.
Let me break it down:
-
Wood swells in humidity and shrinks in dryness. That means warping, cracking, even joints popping loose.
-
Leather? It dries out, then cracks. Or it absorbs moisture and starts to smell weird.
-
Fabric acts like a sponge. And once it smells musty, good luck fixing that.
-
Even metal legs or hinges can rust from moisture in the air.
I had a friend who wrapped a wooden table in a garbage bag and stored it in a “regular” unit. Eight months later, it had mold inside the legs. Inside. I didn’t even know that was possible.
So yeah—climate control matters. A lot.

Step 1: Clean Everything Like You’re Lending It to a Neat Freak
The first time I stored furniture, I skipped cleaning. Big mistake.
Why it matters: Dust, sweat, oils from hands, food crumbs in couch cushions—they all seem harmless, but over time? They attract pests. They settle into the material. And in a humid environment, they’re like a welcome mat for mold.
Here’s what I do now:
-
Wood: Wipe it down with a wood-safe cleaner or a simple vinegar-water mix (but check your finish first). Dry it completely. If I’m feeling extra cautious, I’ll rub on a bit of furniture wax to seal it up.
-
Upholstery: Vacuum absolutely everything. Under cushions. Inside corners. If there’s a stain, treat it. Sometimes I do a quick steam clean, especially if it’s been in a house with pets or kids.
-
Leather: Wipe it gently with a damp cloth. Then condition it. That’s non-negotiable if you want it to stay soft and not start cracking.
-
Metal: Just a clean, dry cloth works most of the time. If there’s rust starting, I’ll sand it down and spray on a rust-preventive coating.
And then I wait. I don’t pack anything until it’s 100% dry. It’s boring, but it beats unpacking mildew later.

Step 2: Take Stuff Apart (You’ll Thank Yourself Later)
If it unscrews, pops off, or slides out—take it off.
I used to think this step was optional. It’s not. Disassembling furniture:
-
Saves space in the unit
-
Reduces the risk of breakage
-
Makes packing way easier
What to take apart? Table legs, headboards, shelves, knobs, glass panels—anything you can comfortably remove without breaking or stripping screws.
I always put the screws and bolts in a labeled zip bag and tape it directly to the item. And I take a few photos while I’m doing it. You’d think you’d remember how your bed frame fits together, but trust me—three months later, you won’t.
Step 3: Keep an Inventory (Doesn’t Have to Be Fancy)
I didn’t do this the first two times. I thought, “I’ll remember what’s in there.”
Nope.
Now I jot down what I’m putting in, what condition it’s in, and take a couple photos. Nothing fancy—just a note on my phone or a quick document in Google Drive. Sometimes I even color-code the tags by room: red for living room, blue for bedroom, green for kitchen stuff.
The photos help later when you’re digging through the unit trying to find “that one chair with the woven seat” and everything starts to look the same.
Bonus: if anything gets damaged, you’ve got proof of its condition before it went in.
Step 4: Use Real Packing Materials, Not Trash Bags
Okay, I get it—those huge black trash bags are tempting. But they’re one of the worst things you can use.
They trap moisture, don’t breathe, and tear easily. Ask me how I know.
Here’s what I use instead:
-
Plastic storage bins: Great for hardware, small detached pieces, cords, or anything loose.
-
Furniture blankets or thick moving pads: These are gold. They protect from scratches and dents, and they’re breathable.
-
Bubble wrap & packing paper: For glass parts, shelves, ceramic drawer pulls, and anything fragile.
I avoid newspaper (the ink transfers) and cling wrap (again—traps moisture).
If you’re wrapping something big, like a sofa or dresser, I’ll use a cotton sheet or a fabric cover. I sometimes use stretch wrap over the blanket to keep it in place—but never directly on the furniture.

Step 5: Wrap According to What It’s Made Of
Wood
Clean, dry, wax. Then wrap it in fabric or a breathable cover. If I’m stacking something on top, I’ll lay a piece of cardboard or a flat wooden board between layers to avoid pressure marks.
Upholstered
After vacuuming, I wrap it in cotton sheets or soft covers. Never plastic. If I can, I elevate it on a pallet so it’s not sitting directly on the concrete floor.
Leather
Condition it, wrap it lightly in breathable material, and keep it away from anything that might transfer color—like painted wood or rusty metal.
Metal + Glass
For metal, I use bubble wrap or blankets plus rust protection spray if needed. Glass? Always wrap it with the edges and corners padded. And I store it upright, like a mirror, never flat.
Step 6: Pack the Unit Like You’re Tetris Champion
This part’s actually kind of fun.
I start by mapping where the big stuff goes. Heavy things like dressers and tables go on the bottom. Lighter stuff goes up top. I try to leave a little aisle down the middle so I can reach things without unpacking the whole space.
I always raise furniture off the floor using pallets or blocks—especially if the floor is concrete. Even climate-controlled units can have cold, damp floors.
And I leave a few inches of space between wrapped pieces. Airflow is good. Condensation is not.

Step 7: Check In Every Few Months
Even if you’re not planning to use the furniture anytime soon, it’s worth visiting your storage unit every couple of months. I usually just pop in, lift a few covers, and make sure:
-
Nothing smells weird
-
No signs of moisture or pests
-
The air feels dry
-
Leather and wood still look okay
If I’m feeling thorough, I’ll replace any moisture absorbers or silica packs. Takes 10 minutes, tops.
Common Mistakes I’ve Made (and Seen Friends Make, Too)
Let me save you from yourself:
-
Wrapping fabric or wood in plastic = mold risk
-
Storing stuff that’s even slightly damp
-
Forgetting to label anything
-
Stacking furniture that’s not meant to be stacked
-
Ignoring the table apron (those little ledges under tables—knees hate them)
-
Skipping the cleaning step because “I’ll deal with it later”
Later usually means never. And mold doesn’t wait.
Final Thought
Storing furniture isn’t just about clearing space—it’s about not ruining the stuff you worked hard to buy (or inherited from someone you care about). Take the extra hour to clean, wrap, label, and pack it properly.